Vagrant Virtualised Dev Environments
In case you’ve been living under a rock for the past couple of years, Vagrant is the latest development in easily controlled virtualised environments. In their own words:
The vision of the project is to create a tool to transparently manage all the complex parts of modern development within a virtual environment without affecting the everyday workflow of the developer too much.
Vagrant automates creation and provisioning of virtual machines within VirtualBox via the command line, whilst also allowing for easy distribution and reuse across multiple projects. In this article, I’m going to look at how it can make life considerably easier when dealing with development environments.
Previously
Previously I’ve written a couple of articles on virtualised development environments; one on VMWare and one on VirtualBox. Since then I’ve upgraded my model to use Vagrant, which allows me to control my environment per project, and also fixes me up with painless access to Puppet provisioning.
This has completely altered my workflow for development. To help you to understand why, I’m going to walk through how Vagrant works and then look at setting up a Vagrant-powered development environment.
How it works
The base box
The true power of Vagrant lies within its design. The basis of a Vagrant VM is its “base box” which is simply a VirtualBox VM that represents a base install of your system. This base install has the following basic requirements:
- VirtualBox Guest Additions for shared folders, port forwarding, etc.
- SSH with key-based auto. support for the vagrant user
- Ruby and RubyGems to install Chef and Puppet
- Chef and Puppet for provisioning support
Thankfully the creation of base boxes has been done for you a thousand times over, and the subsequent base box files are available for download at various places across the interwebs. However, should you require something more specific, creating a base box is pretty undemanding and there are even programs like VeeWee which will automate this process for you.
For more information on building your own base box, take a look at the Vagrant base box documentation.
If you’d rather download one that someone else has created, take a look here:
This is a really useful resource set-up by Gareth Rushgrove, the man behind DevOps weekly and also a passionate advocate of Vagrant. If you can’t find the box you need here, create it, host it somewhere, and let Gareth know so he can list it.
The VagrantFile
Once you’ve got a suitable base box available within Vagrant, you’re ready to start using it as the basis for your development environments. The plural is important here; Vagrant allows you to reuse the base box in generating VMs for multiple projects, each with their own set-up. To best understand that, I’ve drawn a very simple diagram:
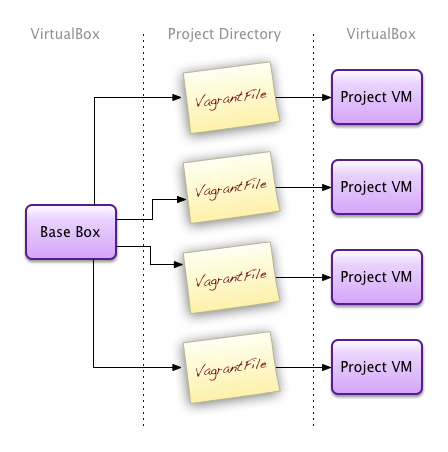
Whilst you’ll probably use the same base box for multiple projects–my box of choice at the moment is a base install Ubuntu 11.10–you probably want a very different set-up per project. For instance, you might have a PHP project that requires a box running Apache and mod_php whilst a Python project better suits nginx proxying to gunicorn. This is entirely possible in Vagrant.
For each project you create, you’ll have a base source directory. It’s here that we’ll create a VagrantFile to control the environment for that project. This means you’ll end up with a VagrantFile per project:
/my_application/
    bin/
    etc/
    lib/
    var/
    VagrantFile
    …

/my_site/
    etc/
    public/
    templates/
    var/
    VagrantFile
    …
To create a VagrantFile you simply run the following command in your project directory:
vagrant init
This will create a nicely annotated VagrantFile. I recommend reading through it to understand the various settings available for you to configure.
The VagrantFile will allow you to change settings on the VM that vagrant will generate for you; for instance, you might want your VM to only have 512Mb of RAM, whereas another might need 2Gb of RAM. You can also specify what base box to use, what ports are forwarded to the VM, what IP address it is configured with, how the VM should handle networking (bridged, NAT, Host Only etc.), and many other system settings besides.
Provisioning
The VagrantFile also allows you to specify whether you want to provision your VM using Chef or Puppet. In OpsWorld™ [possibly the worst theme-park in the world] this means setting up the software on your VM. Personally, I prefer Puppet for this, simply because it uses an external DSL for configuration which I find easier to read than the internal Ruby DSL that Chef uses. (For an explanation of Domain Specific Languages, see Martin Fowler’s excellent blog post, book, and guide page.)
Puppet automates the provisioning, patching, and configuration of operating system and application components across multiple servers. Vagrant uses Puppet to do exactly that; to set-up, patch, and configure the base box to suit your project. To do this, you need to specify that configuration in Puppet manifests–which are basically scripts or programs for Puppet (hence the .pp filename).
The core of the Puppet language is the resource declaration, which represents the desired state of one resource. Manifests can also use conditional statements, group resources into collections, generate text with functions, reference code in other manifests, and do many other things, but it all ultimately comes down to making sure the right resources are being managed the right way.
For more on Puppet and its manifests, I recommend reading the Learning Puppet documentation. You can probably even skip straight to the manifests section. Also, the resource types cheat sheet is invaluable.
Another useful resource for Puppet is the Puppet Cookbook, which contains a collection of task oriented solutions in Puppet.
I’ve recently started keeping a git repository of the various manifests I use for Vagrant. This way, I can copy them and share them between Vagrant projects depending on what software or set-up I require. You can find that repo on GitHub:
http://github.com/nefarioustim/puppet-manifests/
Be aware, I tend to use Ubuntu server hence package management is handled via apt. This means these manifests will need a bit of editing should you want to use them on CentOS or some other linux distro.
The Vagrant VM
The Vagrant VM will be created according to your VagrantFile. This means there will be one per project. This granularity affords you a degree of independence with the VM, and allows you to treat it as a really powerful isolated root for your project. If you’ve ever used virtualenv when working with Python, imagine Vagrant to be virtualenv squared. Since you’re not sharing this environment with any other project, you can set it up, alter it, reconfigure it, and destroy it as much as you please; and since it’s entirely controlled by the VagrantFile and the provisioning scripts, those processes are easy and powerful.
Once set-up, your vagrant VM contains a default user of vagrant. That user has full sudo access and is generally the user you’ll use for everything within your development environment. When you think about it, there’s no real need for complex user set-up within this VM since you could be setting it up and tearing it down as much as you’re doing development on it. If you do need complex user set-ups, there’s nothing stopping you doing that with Puppet or Chef during the provisioning stage.
The Vagrant VM itself can be controlled at the command line through a number of commands:
vagrant up
The first time you run this command, it will copy across the base box specified in your VagrantFile, boot it up with the specified networking set-up, and then provision it according to your Puppet manifests or Chef recipes. Once the box has been set up, and as long as it isn’t destroy, this command will boot up the box and confirm the provisioning. You can deactivate provisioning on this command using the --no-provision switch.
vagrant ssh
Logs into your project VM as the vagrant user, using SSH keys. This circumvents the need for complicated SSH set-ups on your host machine and affords you all the power you need.
vagrant destroy
This will remove all trace of your project VM from within VirtualBox. This means, the next time you run vagrant up, Vagrant will need to recopy across the base box and reprovision it. Most of the time you’ll only really want to do this if you’ve b0rked your VM somehow, or you’ve made a significant change to your VagrantFile; like specifying a different base box for example.
vagrant suspend
Takes a snapshot of your VM and suspends it, allowing you to vagrant resume later. This saves you having to perform a length vagrant destroy && vagrant up cycle, but also stops the VM from taking up valuable memory and CPU cycles.
vagrant resume
Resumes a suspended VM from its snapshot state. The vagrant up command will also resume if it detects a suspended VM.
vagrant halt
Forces shutdown of a VM. This is basically a last resort shut down of your VM and the folks over at Vagrant recommend attempting a graceful shutdown via vagrant ssh first.
vagrant status
Shows the current status of the VM related to the VagrantFile in the current directory.
vagrant provision
Runs the provisioning scripts without reloading the entire Vagrant environment. If you’re just tweaking or adding some cookbooks, this command can save you a lot of time.
There are a few other Vagrant commands available to you but the above are pretty much the majority of what you’ll use on a daily basis. For the complete list, see the Vagrant commands documentation.
An example Vagrant environment
Now that I’ve run through the workings hopefully you’ve got a better understanding of the power of Vagrant and how it can improve your development workflow. To further highlight that, let’s set-up a basic example Vagrant environment on a Mac, via the command line.
Installation the best way
With the release of v1.0 of Vagrant comes a new set of installation packages, available from the Vagrant downloads section. This is by far the best way to install Vagrant and will sort you out with all the prerequisites automatically. These are now the recommended and supported method of installation for Vagrant.
When I began writing this article, these packages did not exist and, as such, I covered the slightly more complicated installation with all its prerequisites (for Mac). With these new packages, you should be able to follow along with the majority of this tutorial in Windows (albeit with slightly differing CLI commands).
Installation the old way
Apple Developer Tools
You’ll need to either install Xcode or the newly created Command Line Tools (significantly smaller than the full Xcode install and designed for stuff like this), which you can download from Apple (you’ll need a free Apple ID to log in):
https://developer.apple.com/downloads/
Homebrew
Firstly, I’d recommend you install some package management for which I use Homebrew. Whilst this is not required—you can always install from source—it is lightyears ahead of MacPorts (the alternative package manager for Mac) and is actively supported on GitHub. If you don’t have it already, do this:
$ /usr/bin/ruby -e "$(curl -fsSL https://raw.github.com/gist/323731)"
This is the recommended install for Homebrew. If you’re unsure, read the script first. It installs Homebrew to /usr/local so that you don’t need sudo when you brew install. It is a careful script, it can be run even if you have stuff installed to /usr/local already. It tells you exactly what it will do before it does it too. And you have to confirm everything it will do before it starts.
You can then use Homebrew to update your Ruby and RubyGems installs
Ruby and RubyGems
Vagrant is powered by Ruby and is installed as a RubyGem. This means you require both Ruby and RubyGems on your development VM host machine. Both are preinstalled on Mac OS, so we only need to update them:
$ sudo gem update --system
Install the gem
Once you’ve made sure you’ve installed all the requirements for Vagrant, the actual installation is really simple. Just install the Vagrant RubyGem:
$ gem install vagrant
Installing this gem will also install VirtualBox (if you haven’t already).
Bob’s your uncle, Mary’s your aunt, and Dave’s your vicar’s love-slave. You are now ready to start building Vagrant environments, but first you’ll need at least one base box.
Base box
You now have the option of downloading a base box, or you can build your own in VirtualBox using your operating system of choice. Since this is supposed to be a development environment, I’d recommend choosing an OS that is as close as possible to the one you’re going to use in production. For me that tends to be Debian or Ubuntu (which is really just another flavour of Debian), so I’m working with an Ubuntu base box.
Building your own base box
Creating a base box is straightforward as long as you’re confident building and provisioning servers. If you’re a bit unsure but you’re not scared to give it a go, I heartily recommend trying to build your own because it’s certainly a learning experience.
To begin with, get yourself a disk image of your chosen OS. For me, that’s Ubuntu 11.10 Server AMD64. Once you’ve got your image, you’re ready to start setting up a VM in VirtualBox.
My template for new VMs is:
- 360Mb RAM
- 10GB VDI disk, dynamically sized
- 64 bit
- In General > Basic choose Linux > Ubuntu (64 bit) as your OS
- Set System > Motherboard > Enable IO APIC to true
- Set System > Processor > Enable PAE/NX to true
- Disable audio
- Disable floppy drive
Once that’s set-up, make sure you’ve “inserted” your OS disk image to the CD/DVD drive on the VM, and fire it up. I generally opt for a standard install for my base box, but if your OS of choice offers a low footprint install intended for virtualisation, you may want to opt to use that instead. If you do, make sure you know the differences; it may use a different kernel and therefore not support some of the motherboard and processor settings we discussed earlier.
When the time comes, make sure you use a default user of:
- Fullname: vagrant
- Username: vagrant
- Password: vagrant
Post install
I’ve written a script to handle post install in a similar method to VeeWee. To use this you’ll need to create a .vbox_version file in your home dir:
$ echo "4.1.8" > ~/.vbox_version
You’ll want to replace the “4.1.8” with the relevant version of your VirtualBox installation because this will be used to work out which Guest Additions to install. Next let’s switch to root for ease:
$ sudo -i
You’ll also want to make sure cUrl is installed:
$ apt-get install -y curl
Once you’ve done that, we can download and run the script (raw gist URL shortened for convenience here):
$ curl -L http://git.io/cSGCgw | bash
If you read through the script you’ll see it does the following:
- Creates a log of the date and time we built the box in
/etc - Installs
aptitude - Updates the package list
- Upgrades the installed packages
- Installs a bunch of packages that are useful for set-up
- Installs SSH
- Installs the NFS client
- Sets-up the correct permissions in
sudoers - Installs Ruby and RubyGems
- Installs the Chef and Puppet gems and updates the JSON gem
- Removes the the gemspec for an older version of JSON because it’s broken
- Installs the insecure Vagrant public keys supplied by Mitchell Hashimoto
- Makes sure SSH doesn’t use DNS look-ups
- Installs the VirtualBox Guest Additions
- Zeros out the free space in the image to make it easier to compress
- Removes leftover DHCP and network rules
Once the script completes you should be ready to rock. Better shut down that VM:
$ sudo shutdown -P now
Package up your self-built base box
Assuming the VM you created in VirtualBox is called “ubuntu-11.10”, we package it up using the following command:
$ vagrant package --base ubuntu-11.10 --out ubuntu-11.10.box
The --base parameter refers to the VM in VirtualBox and the --out parameter is what we want our newly packaged .box file to be called. Once you have a .box file, you’re ready to start using it with Vagrant–and you’re also ready to share it with other people should you so wish.
Using a pre-built base box
In true Blue Peter fashion, here’s one I made earlier:
http://timhuegdon.com/vagrant-boxes/ubuntu-11.10.box
For other options, as previously mentioned, have a look at Vagrantbox.es.
Making Vagrant aware of your base box
Assuming you’re in the same directory as your .box file, you can add it to Vagrant using the following command:
$ vagrant box add ubuntu-11.10 ubuntu-11.10.box
The first parameter is the name Vagrant will use to refer to the box in Vagrantfiles, and the last is the path to your .box file.
Configuring your VagrantFile
Now that you’ve downloaded or created a base box, and have made Vagrant aware of it, our next step is to configure a VagrantFile for whatever project we’re working on. It’s here, amongst other things, that we’ll specify which base box we want to use.
Change directory to your project and run vagrant init:
$ cd ~/projects/myproject
$ vagrant init
Vagrant will have now created a VagrantFile at the root of that directory. Let’s open that in the editor of your choice–which for me is Sublime Text 2:
$ subl VagrantFile
If you’ve ever worked with Chef before, or indeed Ruby, you’ll recognise that the VagrantFile is Ruby. You’ll also notice that the folks at Vagrant have made newly created VagrantFiles wonderfully verbose, and if you read through the annotations, all the settings are explained.
For our Vagrant VM we’re going to want to use our base box, so update that line in the Vagrant file to:
config.vm.box = "ubuntu-11.10"
Since we’ve already installed this base box, we don’t need the VagrantFile to be aware of a hosting URL, so leave that line commented.
The next line defines whether you want to run your VM headless (i.e. without firing up the VirtualBox GUI). Generally the only time you’ll want to uncomment this line is if you’re debugging a problem with the VM. Most of the time you won’t want to waste system resources on the VirtualBox GUI. With that in mind, leave it commented.
Now we can choose networking options. For the purposes of this example I’m assuming we’re working on a local development machine and, as such, host-only networking will suit our purposes. If we were working on a separate dev box that may host multiple VMs, we’d probably want to use bridged networking to expose them to the network. For now though, just uncomment the following line:
config.vm.network :hostonly, "33.33.33.10"
This means the VM will be exposed to the host machine on the IP address 33.33.33.10, and will be able to access your network. However, machines other than your host machine will not be able to see the VM.
Since we’ve uncommented this line, leave the bridged networking line commented.
Now we have the opportunity to forward some ports from the host to the guest OS. This can be useful if you want to temporarily expose a host-only network VM to machines on your network, however, for the purposes of this tutorial, please leave this line commented too. Later on we’re going to install a web server and connect to this VM as if it were any other server on our network, so port forwarding is not required here.
Next we need to define some folders to share with the VM, and how to share them. It’s a well recorded fact that when using VirtualBox on a unix-based system it struggles as the number of files within any shared folder increases. For this reason, if you’re running Vagrant on a Mac, it’s better to use NFS to mount your directories—Windows does not suffer the same issue so NFS is not required.
To set up a directory to share on your Vagrant VM, simply declare it as follows:
config.vm.share_folder("v-root", "/vagrant", ".", :nfs => true)
This will create a directory /vagrant at the root of your VM. That folder will be shared with the directory on the host containing your Vagrantfile, implied by the . directory reference. For a Windows host, just set nfs: => false.
Now we can choose how the Vagrant VM is provisioned. As I said earlier, I personally prefer to use Puppet, so uncomment the following lines and update the manifests path. I find “puppet” is more obvious than “manifests”:
config.vm.provision :puppet do |puppet|
  puppet.manifests_path = "puppet"
  puppet.manifest_file  = "base.pp"
end
This will look for our base manifest, “base.pp”, in a directory called “puppet” at the same directory level as our VagrantFile. We’ll set that up later.
Finally, let’s add a last line to our VagrantFile to tell it to set-up a VM with 512Mb of memory:
config.vm.customize ["modifyvm", :id, "--memory", "512"]
You’ll notice this particular command isn’t annotated in the VagrantFile. For more information about customising the specific characteristics of the VM, take a look at the Vagrant docs.
Once you’ve completed these changes, your VagrantFile should look something like this (if you remove all the commented lines):
# -*- mode: ruby -*-
# vi: set ft=ruby :

Vagrant::Config.run do |config|
    config.vm.box = "ubuntu-11.10"

    config.vm.network :hostonly, "33.33.33.10"

    config.vm.share_folder("v-root", "/vagrant", ".", :nfs => true)

    config.vm.provision :puppet do |puppet|
        puppet.manifests_path = "puppet"
        puppet.manifest_file  = "base.pp"
    end

    config.vm.customize ["modifyvm", :id, "--memory", "512"]
end
Our Vagrantfile will now create exactly the VM we require when we run the vagrant up command. However, the VM itself only contains the software installed as part of the base box. Since this VM is serving our project, we probably want some more stuff on there like a web server or a particular version of a language. To set that up, we’ll need to use a provisioner which is where Puppet comes in. (If you want to use Chef, don’t let me stop you. I just won’t be covering Chef here.)
Provisioning with Puppet
Provisioning happens in Vagrant every time we run vagrant up or vagrant provision. This sets up the software on your VM according to a set of manifests (or “recipes” in Chef). Those manifests basically tell Puppet what it should script on the VM. This means you can update anything, including copying across files, updating files already on the system, installing and uninstalling packages, changing permissions, stopping and starting services, and a whole host of other software changes.
To do this, you’ll need to learn Puppet’s manifest language. This is a custom DSL that is quite easy to learn; although the Puppet documentation can be a little difficult to navigate. I’d recommend looking at:
To begin, let’s set up a directory in our project folder to contain our manifests, and another folder within that to contain any files we may want to copy across to our guest OS with Puppet. From the directory on your host that contains your Vagrantfile do:
$ mkdir -p ./puppet/files
Now in the newly created puppet folder, create a file entitled base.pp:
$ cd puppet && touch base.pp
Note that Puppet manifests have the .pp extension. You should be able to find syntax rules for all good editors to deal with this extension and file type.
Open up the newly created base.pp file in your editor of choice. Puppet manifests have a number of constructs, chief of which is the concept of a “resource”. Resources can be packages, files, executed commands, users, groups and services. These resources can then be organised within classes. So let’s start with a class for our dev box:
class devbox {
}
As an example, let’s set-up nginx as a web server. To do that, the first thing we’re going to need to do is install the package:
package { "nginx":
    ensure => latest
}
That was quite simple, right? Puppet already knows to use apt as the default package installer on Ubuntu, so this command checks the apt-cache to see if the latest version of the package is installed, and if it isn’t installs it.
Now we should make sure the nginx service is running:
service { "nginx":
    ensure => running,
    hasrestart => true
}
Equally simple. Here we’ve told Puppet to check the service nginx is running, and we’ve also informed it that the service has a restart function which Puppet can make use of.
I’ve stuck a bunch of hacked together Puppet manifests into a repository on GitHub. Feel free to poke about in them; I’ll be updating them as I do more stuff with Vagrant. For now, at least, take a look at the files directory because we can repurpose some of my set-up for this example. Save the following from my repo to your puppet/files directory which we created earlier:
files/nginx.conffiles/vhost.conf
Now we need to get these files from your host computer to the guest OS in the Vagrant VM. Once again, this is pretty simple:
file { "/etc/nginx/nginx.conf":
    owner  => root,
    group  => root,
    mode   => 644,
    source => "puppet:////vagrant/puppet/files/nginx.conf"
}

file { "/etc/nginx/sites-available/vagrantsite":
    owner  => root,
    group  => root,
    mode   => 644,
    source => "puppet:////vagrant/puppet/files/vhost.conf"
}
Notice the source exists within our /vagrant directory, which we’ve already set-up as a NFS shared directory. This means we’re effectively copying the file from there to the /etc/nginx/ directory on the guest. Also, if the destination directory does not already exist, Puppet will create it. Notice how I’m also setting the owner, group, and mode of the file during the copy.
So far we’re getting along fine, but wouldn’t it be nice if we could let Puppet know we’d like to handle these stages in some semblance of an order? We can do that in the resources using the require parameter:
file { "/etc/nginx/nginx.conf":
    owner  => root,
    group  => root,
    mode   => 644,
    source => "puppet:////vagrant/puppet/files/nginx.conf",
    require => Package["nginx"]
}
Note the reference to the resource we require is capitalised? This is a subtle difference between declaring and reference a resource.
What would also be nice is if we could tell the nginx service that, by changing the configuration files, we’d like it to restart. To do that we use the notify param:
file { "/etc/nginx/nginx.conf":
    owner  => root,
    group  => root,
    mode   => 644,
    source => "puppet:////vagrant/puppet/files/nginx.conf",
    require => Package["nginx"],
    notify => Service["nginx"]
}
We just have a couple more things to do now. Firstly, let’s create a symbolic link to sites-available from within sites-enabled so that our newly copied across vhost is picked up by the nginx configuration:
file { "/etc/nginx/sites-enabled/vagrantsite":
    ensure => symlink,
    target => "/etc/nginx/sites-available/vagrantsite",
    require => Package["nginx"],
    notify => Service["nginx"]
}
Notice I haven’t required the original file for this. That’s because it’s not a requirement for creating the symlink in the first place.
Secondly, let’s remove the default vhost because we don’t need it:
file { "/etc/nginx/sites-enabled/default":
    ensure => absent,
    require => Package["nginx"],
    notify => Service["nginx"]
}
With all that in place, and adding a full set of require and notify parameters, our final class should look like this:
class devbox {
    package { "nginx":
        ensure => latest,
    }

    file { "/etc/nginx/nginx.conf":
        owner  => root,
        group  => root,
        mode   => 644,
        source => "puppet:////vagrant/puppet/files/nginx.conf",
        require => Package["nginx"],
        notify => Service["nginx"]
    }

    file { "/etc/nginx/sites-available/vagrantsite":
        owner  => root,
        group  => root,
        mode   => 644,
        source => "puppet:////vagrant/puppet/files/vhost.conf",
        require => Package["nginx"],
        notify => Service["nginx"]
    }

    file { "/etc/nginx/sites-enabled/vagrantsite":
        ensure => symlink,
        target => "/etc/nginx/sites-available/vagrantsite",
        require => Package["nginx"],
        notify => Service["nginx"]
    }

    file { "/etc/nginx/sites-enabled/default":
        ensure => absent,
        require => Package["nginx"],
        notify => Service["nginx"]
    }

    service { "nginx":
        ensure => running,
        hasrestart => true,
        require => Package["nginx"]
    }
}
The next time we fire up our Vagrant VM, nginx will be installed, set-up, and running, and attempting to serve a website from the /vagrant/static directory on your guest OS. This will be the static directory within the same directory as your Vagrantfile on the host.
On the host, let’s create that directory and stick a very basic file in it:
$ mkdir static && cd $_
$ echo 'Hello world from my Vagrant VM!'' > index.html
Not the most well-formed example, but it’ll do. Now let’s fire up the Vagrant VM:
$ vagrant up
This should copy across the base box we installed, set-up all the things we specified in the Vagrantfile, and begin provisioning from our manifest. You should see messaged that Puppet has successfully installed nginx and the relevant files, and that the service is running. Now point your browser to:
33.33.33.10
Ta da! You have successfully set-up a vagrant development environment with specific software requirements for a specific project. Congratulations! Now go away and hack it.
Summary
So this has been an epic 5000 word look at why Vagrant is now my development environment tool of choice. I hope you can see that it makes working with multiple projects—each with their own requirements for an environment—as simple as possible. With a good understanding of the features of Vagrant, and also of the provisioning tool of your choice, you really do have the power to fire up and destroy environments on a whim.
Apologies for the sheer size of this article but I wanted to make sure I covered as much as possible to help newbies get up and running quickly. It doesn’t take much effort, and it really empowers developers to be able to spin up new environments quickly for hacking around in.